
You’re new to Pro Tools and want to make your first techno track. Keep it simple. Don't stress about production techniques. Pro Tools by Avid is a music production software that can help you create dancefloor ready tracks using just techno samples.
Let's walk you through making your first techno music production using audio samples only. No synths or instruments – just download Pro Tools DAW and free techno samples.
What You'll Learn
- Setting up your Pro Tools session for techno music production
- Importing and organizing techno samples
- Building a solid techno arrangement
- Applying essential mixing and effects techniques
- Exporting your finished techno track
Getting Started with Pro Tools
Starting with Pro Tools? Let’s keep it simple.
Open the app and create a new session. Drag your favorite techno samples. Organize your tracks. No need to overthink it. Load your samples, set your tempo, and you’re already building a track.
That’s it. No synth programming, no production knowledge.
1. Setting Up Your Session
Create a New Session:
- Open Pro Tools and select
File > New Session. - Choose a template or start from scratch.
- Set your sample rate (44.1kHz is standard) and bit depth (24-bit is ideal).
Configure Your Audio Interface:
- Go to
Setup > Playback Engine. - Select your audio interface and adjust buffer size for low latency.
Pro Tip: Use a buffer size of 128 or 256 samples for a good balance between latency and performance.

2. Importing and Organizing Samples
Find Your Samples:
- Browse Sample Focus for high-quality techno loops and one-shots.
- Download and unzip your sample packs.
Import Samples into Pro Tools:
- Drag and drop samples directly into the Edit window.
- Use
File > Import > Audioto browse and import samples.
Organize Your Samples:
- Create separate tracks for kick, percussion, bass, synths, and effects.
- Use the Clip List to manage and preview your samples.
Pro Tip: Color-code your tracks for easy navigation. Right-click the track name and select Track Color.
Depth with Techno Drum Loops
Techno has rhythmic complexity and precise groove. Drum loops are what achieve this. Using techno drum loops, you can lay out your track with energy and movement. Here's how to do it in Pro Tools:
Right Drum Loops
- Kick Loops: Start with a solid kick drum loop. Look for kicks with a tuned low end to create a driving force.
- Percussion Loops: Layer loops with claps, snares, and hi-hats to build intricate grooves. High-energy percussion gives techno its punch.
- Tops and Shakers: Add high-frequency drum loops to fill out the mix and add rhythmic texture.
Drum Loop Integration
- Import into Pro Tools: Drag your selected drum loops into Pro Tools via the File > Import > Audio option. Use the Edit window for easy placement.
- Align to Tempo: Use Elastic Audio to adjust the loops to your session’s BPM. Ensure timing is tight for a cohesive groove.
- Layer for Complexity: Combine multiple drum loops, like kick and hi-hat patterns, to create depth. Use EQ to carve out frequencies and avoid clashing.
Drum Loops with Effects
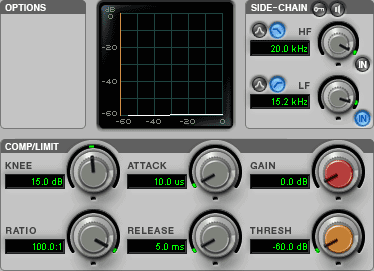
- Compression: Apply light compression to tighten the dynamics and add punch. Use the Dyn 3 Compressor/Limiter in Pro Tools.
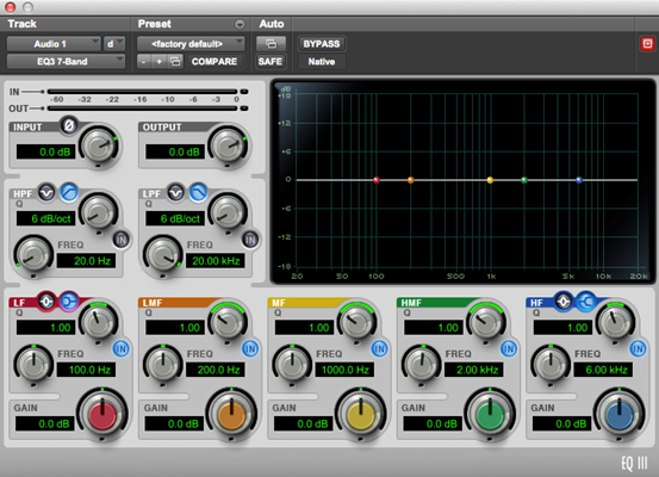
- EQ: Remove low-end rumble from tops and shakers to maintain clarity. The EQ III plugin is perfect for this.
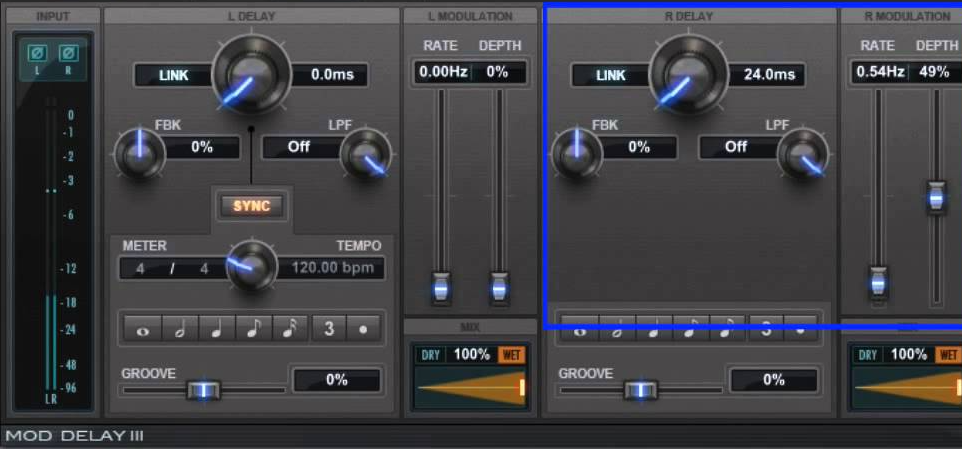
- Reverb and Delay: Add subtle reverb to hi-hats or snares for a spacious feel. Use D-Verb and Mod Delay III to create rhythmic echoes.
Pro Tip for Techno Drum Loops
Group your drum loops in a bus channel and apply parallel compression. This boosts the punch without sacrificing dynamics. It gives your techno beats a professional sound.
By carefully selecting and processing techno drum loops, you can create compelling grooves that form the backbone of your track. Pair these loops with extra percussion and melodic elements to build a driving techno production.

3. Building Your Techno Arrangement
Drums:
- Kick: Start with a solid kick drum loop. Techno kicks are usually tuned and have a prominent low end.
- Percussion: Layer hi-hats, snares, claps, and other percussive elements to build your groove.
- Tops: Add high-frequency loops for extra rhythmic complexity.
Bass:
- Choose a bass loop that complements your kick.
- Adjust the pitch if needed to fit your track's key.
Synths and Melodies:
- Add synth loops for atmospheric textures and melodic content.
- Use stabs, bleeps, and other techno-specific sounds.
Effects:
- Incorporate SFX, transitions, and atmospheric sounds for added interest.
Pro Tip: Use the Grid mode (Cmd/Ctrl + G) to snap samples to the beat for tight timing.
4. Essential Mixing and Effects Techniques
Levels and Panning:
- Adjust track volumes using the faders in the Mix window.
- Pan tracks left or right for stereo placement.
EQ and Compression:
- Use the built-in EQ III to cut unwanted frequencies and boost others.
- Apply compression with the Compressor/Limiter Dyn 3 to control dynamics.
Effects:
- Add reverb with D-Verb for depth.
- Use Mod Delay III for delay effects.
- Experiment with distortion and saturation for gritty textures.
Pro Tip: Use sends to apply reverb and delay to multiple tracks simultaneously. This saves CPU and creates a cohesive mix.
Atmosphere with Techno Synth Loops
Techno’s melodic and atmospheric appeal often stems from its use of techno synth loops. These loops add depth, tension, and mood, making them essential for creating immersive tracks. Whether you're crafting melodic lines or textural backdrops, synth loops can elevate your production in Pro Tools.
Selecting Synth Loops
- Melodic Loops: Look for catchy loops with repetitive patterns to create hypnotic rhythms. These work well as lead elements.
- Atmospheric Loops: Use pads or ambient textures to build a lush, expansive soundscape.
- Textural Loops: Add granular or distorted loops to introduce character and grit. These are great for breakdowns or transitions.
Working with Synth Loops in Pro Tools
- Import and Place: Drag your synth loops into Pro Tools, organizing them by type (leads, pads, textures).
- Align with Key: Use the Transpose function to pitch the loops into your track’s key. This ensures harmony with other elements.
- Snap to Grid: Enable Grid Mode (Cmd/Ctrl + G) to lock loops to the tempo for tight synchronization.
Processing Synth Loops
- EQ: Use EQ III to carve out unnecessary frequencies. Boost mids for presence or cut lows to avoid clashing with basslines.
- Reverb and Delay: Apply reverb using D-Verb for a spacious, immersive feel. Use Mod Delay III to add rhythmic delay effects.
- Saturation: Add warmth and character with saturation plugins. Subtle distortion can make loops stand out in the mix.
Layering Techniques
- Combine melodic loops with atmospheric pads for rich harmonic content.
- Use textural loops to add detail during breakdowns or intros.
- Stack multiple synth loops across octaves to create a full-bodied sound.
Pro Tip for Techno Synth Loops
Automate filters or effects to keep synth loops evolving throughout your track. For example, gradually increase resonance or introduce delay tails during transitions to maintain interest and build tension.
Incorporating techno synth loops allows you to shape the melodic and emotional core of your track. With careful processing and layering, these loops can transform your production into a dynamic, textured techno masterpiece.
5. Exporting Your Finished Techno Track
Bounce Your Track:
- Go to
File > Bounce To > Disk. - Choose your file format (WAV is standard), sample rate, and bit depth.
- Select
Interleavedfor a stereo file.
Final Touches:
- Normalize your track to ensure optimal volume.
- Add metadata like artist name, track title, and artwork.
Pro Tip: Listen to your final mix on different systems (headphones, speakers, car stereo) to ensure it sounds good everywhere.
Where to Find Techno Samples
Discover high-quality techno samples and loops tailored for Pro Tools on Sample Focus.

From drum kits to synth presets, our curated collections have everything you need to start producing like a pro. Browse our Techno category to find the perfect sounds for your next track.
Recap
- Session Setup: Optimize Pro Tools with proper sample rates, buffer sizes, and track organization.
- Sample Import: Use Sample Focus to find high-quality techno loops and organize tracks effectively.
- Techno Arrangement: Build grooves with kicks, percussion, and atmospheric loops using Grid mode.
- Mixing & Effects: Apply EQ, compression, reverb, and delay for a polished, dance-ready mix.
- Exporting: Finalize and bounce your track to WAV, ensuring playback consistency across systems.
Final Words
Start simple. You can make a techno track using just samples. Grab some techno drum loops and synth loops. Layer kicks, claps, or hi-hats with one-shot samples for texture. Drag everything into Pro Tools, switch on Grid Mode, and line it up to the beat. Add a little reverb or delay, maybe tweak the EQ.
With the right samples and a good groove, you’re set.
Start with our techno sample collections to find your sound.


Comments