
Picking the right DAW (Digital Audio Workstation) can feel like a big decision, and for good reason. It is very important. Ableton Live and Pro Tools are two of the best options out there, but they’re built with different goals in mind. Let’s break down what each one offers so you can figure out which one fits you best. Especially if you are starting out in 2025.
Understanding Each DAW
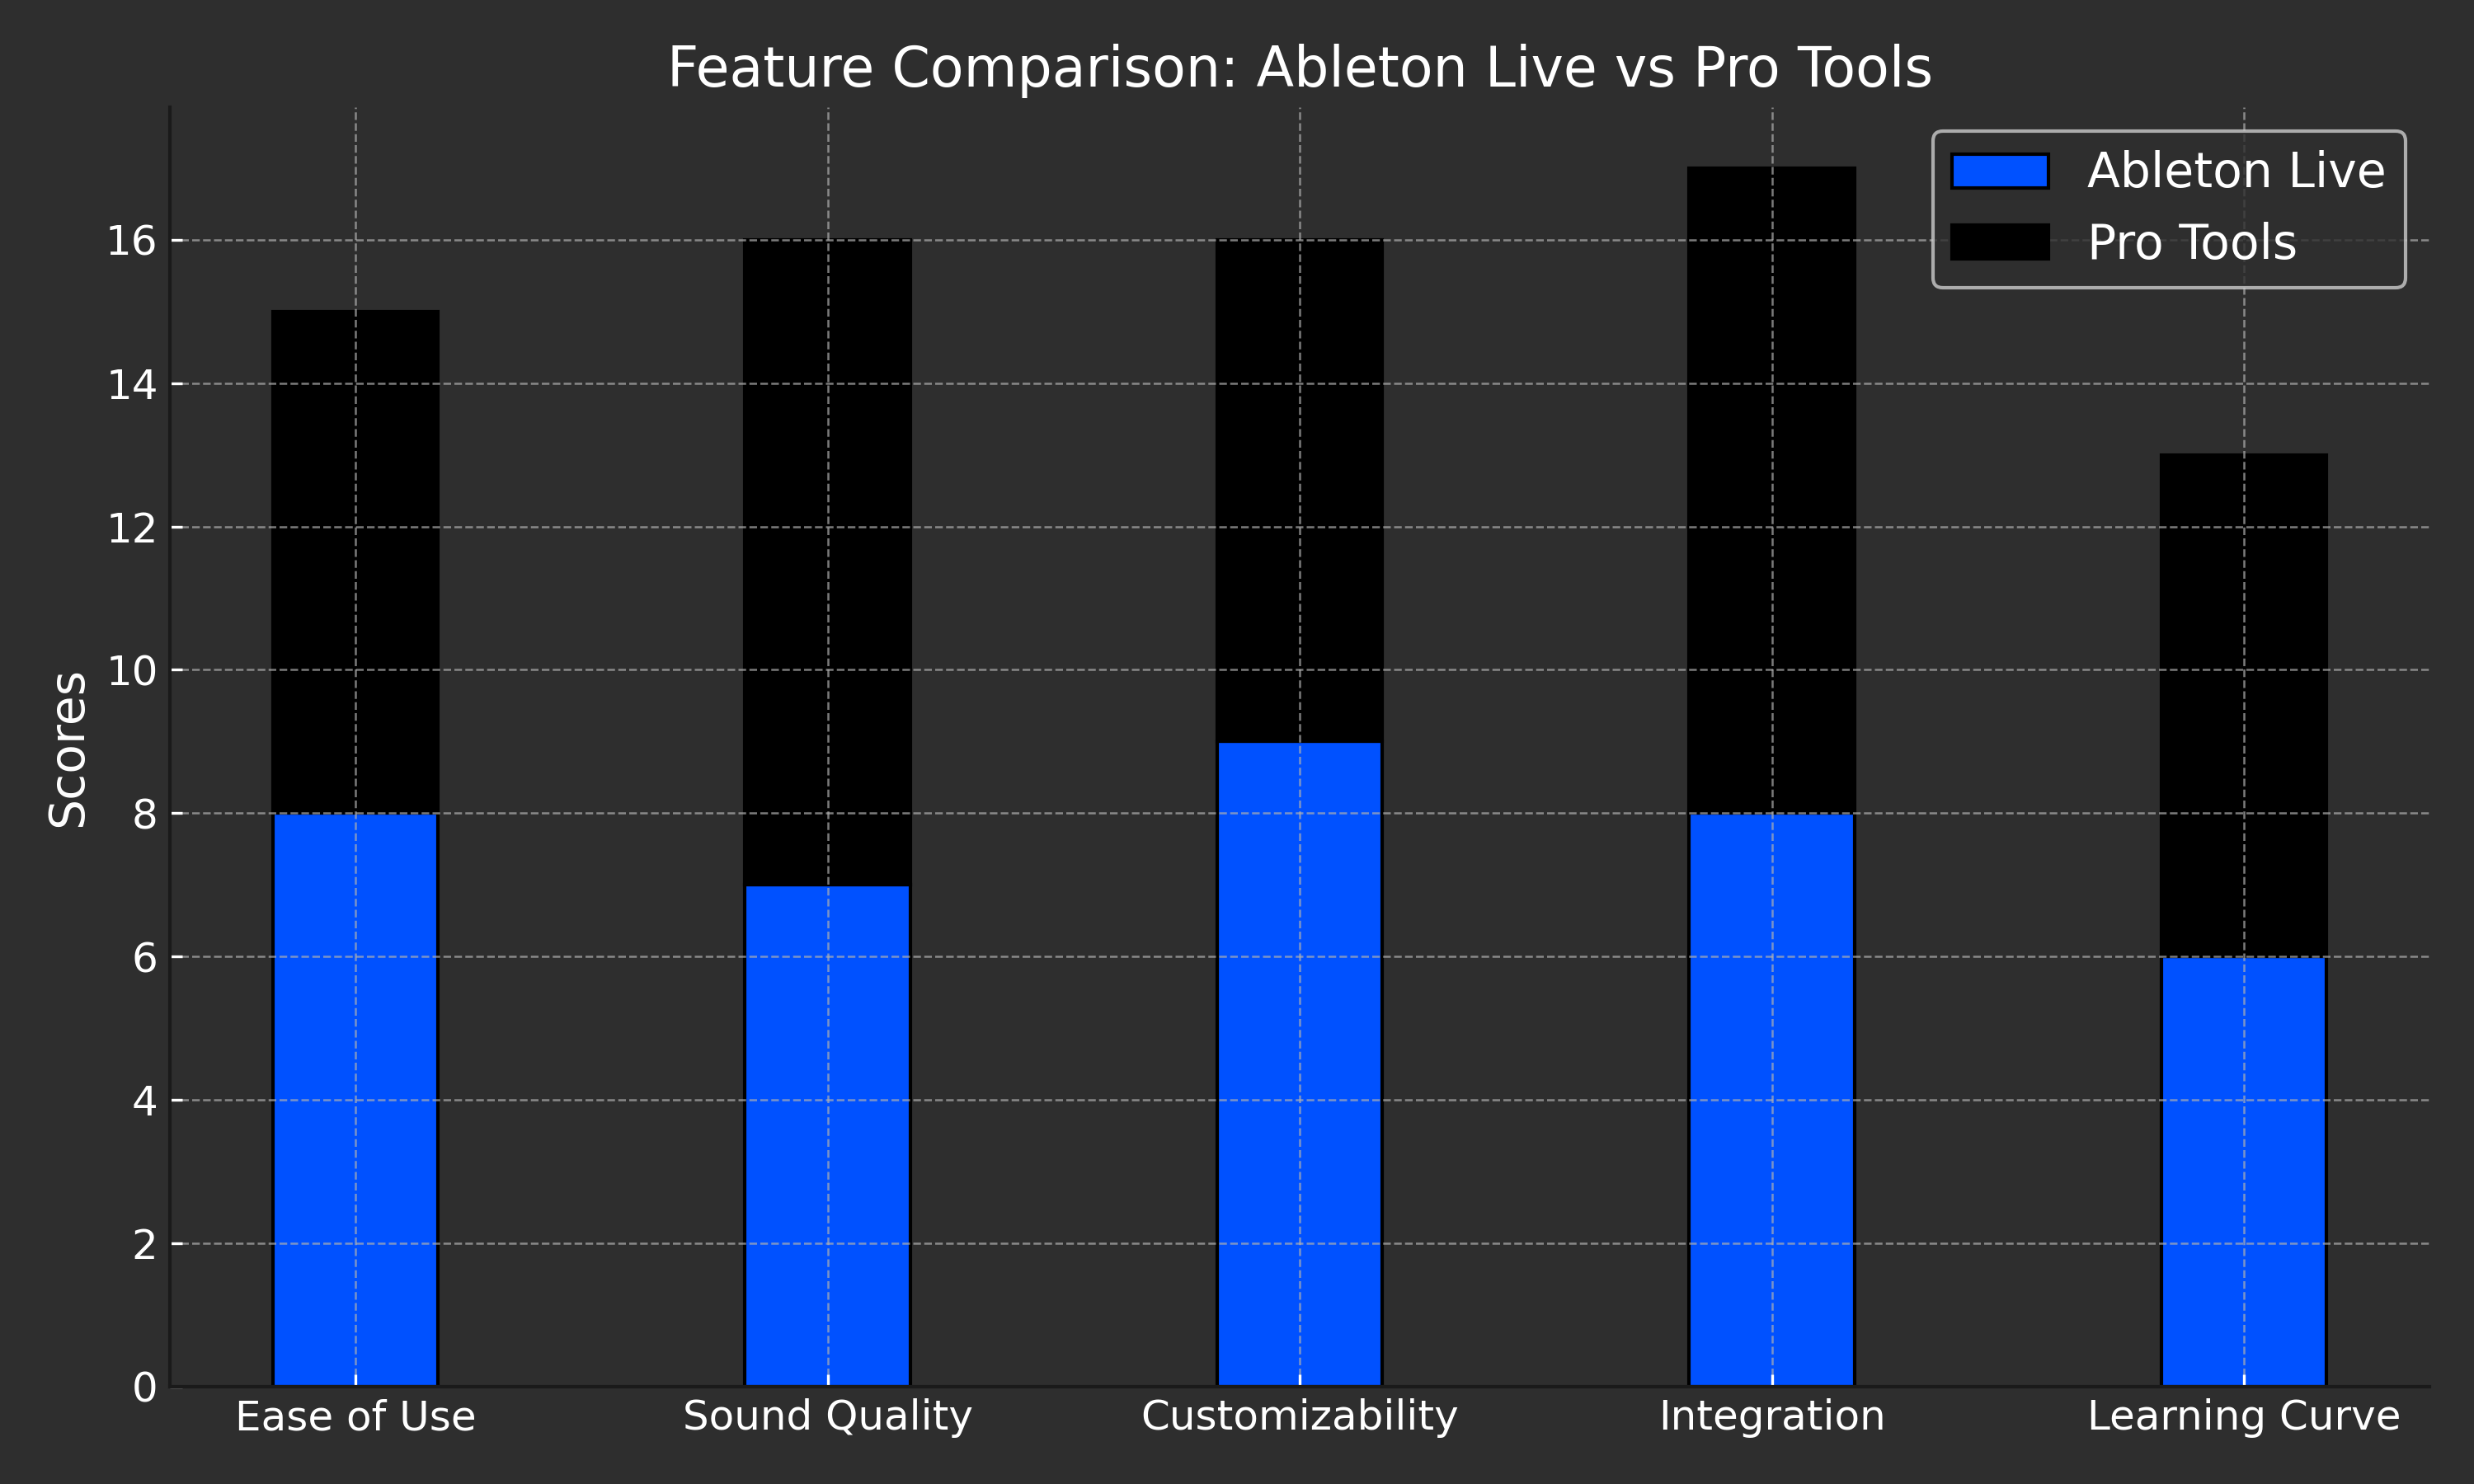
Ableton Live:
Designed for electronic music and live performances, Ableton is a favorite for producers who go for creativity and experimentation. Its standout features include:
- Real-time Manipulation: Seamlessly adapt audio during performances.
- User-Friendly Interface: Minimalist design perfect for beginners.
- Advanced MIDI Capabilities: Unparalleled for electronic genres.
Pro Tools:
The standard for studio professionals, Pro Tools stands out for precise audio editing and mixing. Key highlights include:
- High-Quality Recording Tools: Ideal for live instruments.
- Industry Standard Features: Trusted for large-scale productions.
- Spatial Audio Support: Essential for immersive audio formats like Dolby Atmos.
Trends Shaping DAW Choices in 2025
1. AI Integration
AI tools are changing the dynamics of music production with features like automated mixing and intelligent sound suggestions.
- Ableton Live: Supports third-party AI plugins, ideal for enhancing creativity in electronic compositions.
- Pro Tools: Emphasizes precision with built-in AI tools for detailed editing.
2. Immersive Audio
Spatial sound is pushing the limits for music production in film scoring and gaming.
- Pro Tools: multichannel mixing and export options for formats like Dolby Atmos.
- Ableton Live: Better suited for simpler spatial audio tasks but less robust for large-scale projects.
3. Genre-Blending Workflows
Music genres are blurring. A versatile DAW can make all the difference.
- Ableton Live: Encourages creative experimentation with intuitive drag-and-drop tools.
- Pro Tools: Precise tools are better for complex, layered compositions.
4. Cloud-Based Collaboration
Modern music production now relies heavily on remote collabs and teamwork.
- Ableton Live: Offers basic cloud integration, ideal for sharing creative ideas.
- Pro Tools: Advanced collaboration tools, perfect for professional studio environments.
Practical Use Cases for Beginners
Choose Ableton Live If You:
- Are drawn to electronic or experimental music.
- Plan to perform live sets.
- Value quick, intuitive workflows.
Choose Pro Tools If You:
- Focus on recording live instruments.
- Aim for a career in film scoring or immersive audio.
- Want industry-standard tools for detailed production.
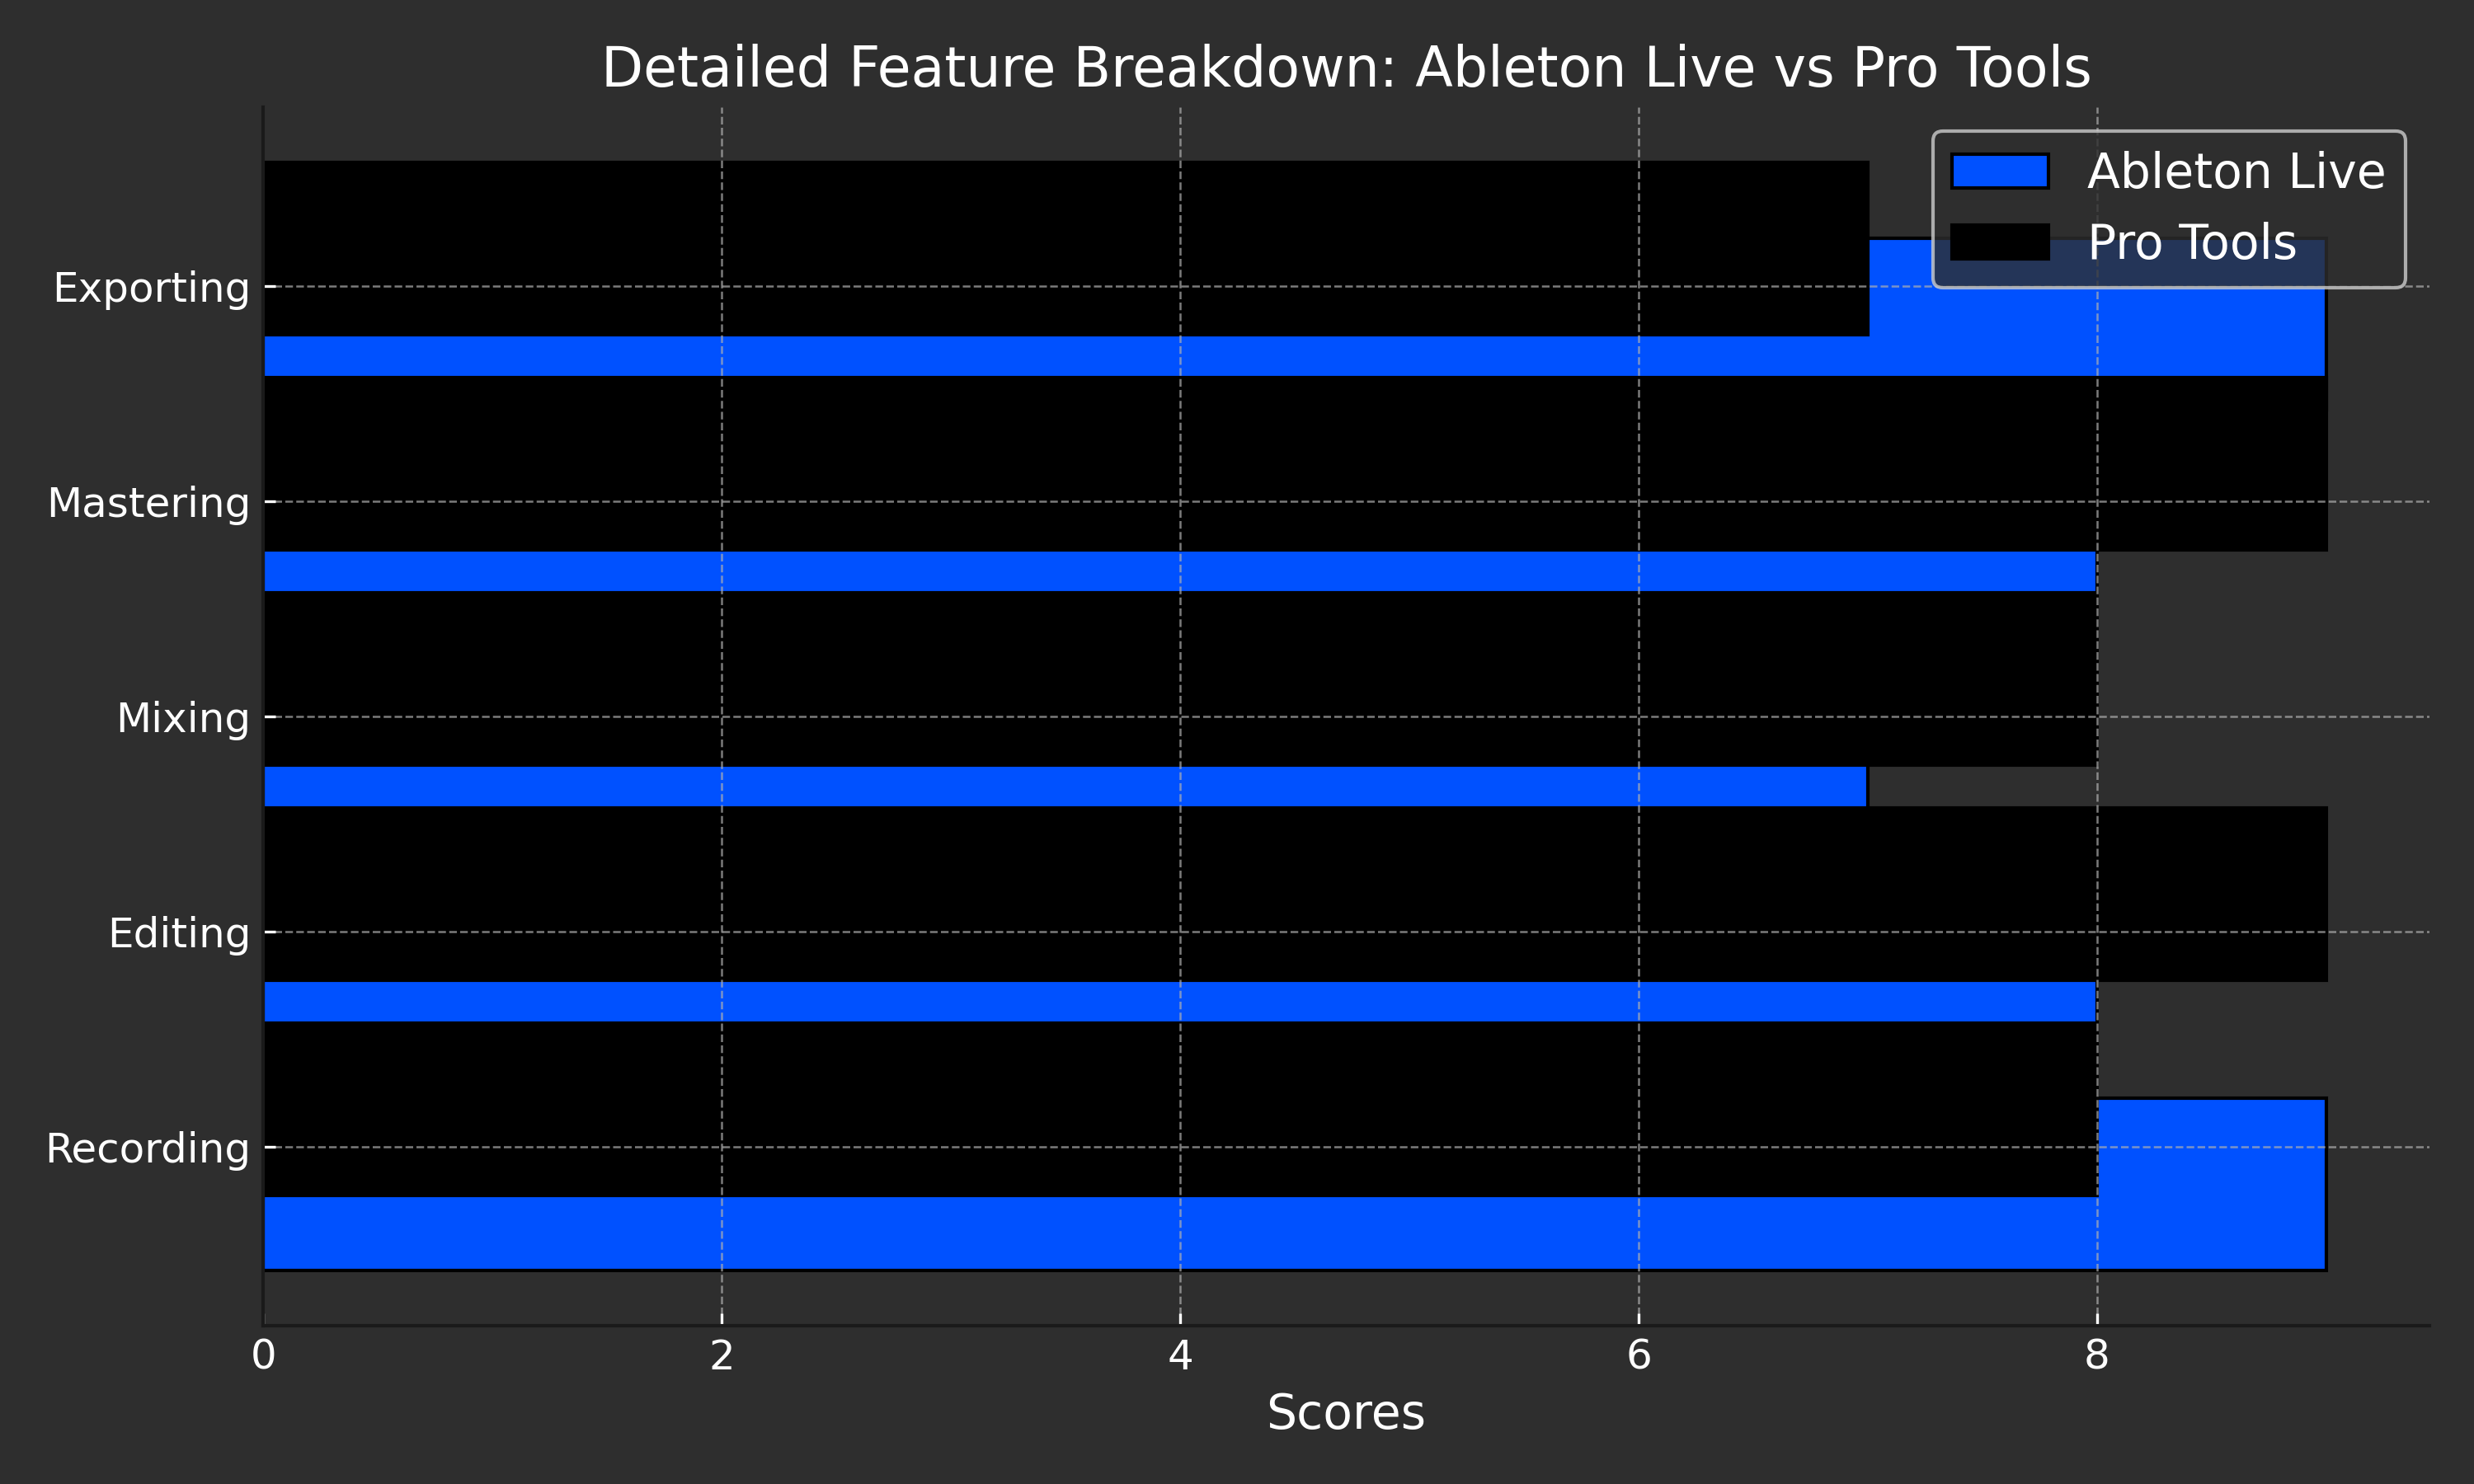
Technical Features Breakdown
Ableton Live’s MIDI Edge
- MIDI Effects: Tools like Arpeggiator, Velocity, and Scale open creative possibilities.
- Max for Live: Extend functionality by building custom instruments or effects.
Pro Tools’ Editing Power
- Elastic Audio: Stretch and compress audio without artifacts.
- Clip Gain: Adjust volume levels directly on individual clips before processing.
AI and Automation
- Both DAWs support AI-driven plugins like iZotope Neutron for mixing assistance and generative tools like AIVA for composition.
Spatial Audio
- Pro Tools: Direct Dolby Atmos integration.
- Ableton Live: Compatible with surround sound via third-party plugins but lacks native Atmos support.
Beginner Workflows for Ableton Live
1. Setting Up Your First Project in Ableton Live
- Installation and Configuration:
Download and install Ableton. Configure your audio interface in Preferences (Ctrl/Cmd + ,). Set buffer size to 128-256 samples for low latency.- Audio Input: Connect instruments or a mic via your interface.
- MIDI Devices: Sync your MIDI keyboard in the "Link/MIDI" tab.
2. Understanding Session vs. Arrangement Views
- Session View: Ideal for brainstorming. Each cell (clip) allows you to test loops, sounds, and ideas.
- Drag samples directly into cells. Use the Clip Editor to adjust loop length or pitch.
- Arrangement View: Structure your track here. Switch views using Tab.
3. Layering and Sound Design
- Drag and drop multiple samples.
- Use Instrument Racks to combine devices and effects. Adjust volume envelopes in the Clip Editor to avoid clashes.
- Add EQ Eight to clean up frequencies or emphasize specific ranges.
4. Automation and Modulation
- Enable automation recording (press "A").
- Automate filter sweeps, volume fades, or panning for dynamic effects.
5. Export Settings
- For streaming platforms, export at 44.1kHz/16-bit WAV.
- For mastering, opt for 48kHz/24-bit WAV.
Pro Tools: Precision Workflows for Beginners
1. Configuring Your Studio in Pro Tools
- Hardware Setup:
After installation, configure the I/O settings under Setup > I/O. Assign inputs and outputs specific to your interface. - Project Setup:
Use 48kHz sample rate and 24-bit depth for professional-grade audio. Save sessions in WAV format.
2. Recording Live Instruments
- Track Setup:
- Create a mono track for vocals, stereo for instruments.
- Use Low Latency Monitoring to minimize delay during recording.
- Input Levels:
- Aim for peaks around -12dBFS to avoid clipping.
- Editing Workflow:
- Use Slip Mode for freeform edits or Grid Mode for tempo-locked adjustments.
- Cut, trim, and nudge regions for precise alignment.
3. Mixing Essentials
- Signal Chain:
- Start with EQ III to remove unwanted frequencies.
- Add Dynamics III Compressor for consistent levels.
- Send and Return:
- Create an Aux track for reverb. Route sends from audio tracks to the Aux for cohesive space effects.
- Automation:
- Write automation for volume, panning, or plugin parameters. Use Breakpoints for smooth transitions.
4. Export Settings
- Use Bounce to Disk (File > Bounce to Disk). Choose WAV, 44.1kHz/16-bit for final output.
Workflow Tips
Ableton Live:
- Use Warp Modes intelligently:
- Beats Mode for drums (preserves transients).
- Complex Pro Mode for vocals or full tracks.
- Group tracks (Ctrl/Cmd + G) for efficient processing with shared effects.
Pro Tools:
- Leverage Batch Fades (Ctrl/Cmd + F) to save time on crossfades.
- Use Templates for recurring session setups to streamline your workflow.
DAW Practical Advice
- Focus on Fundamentals First: Master basics like EQ, compression, and reverb before diving into advanced features.
- Keyboard Shortcuts: Learn essential shortcuts for faster navigation and editing.
- Ableton: Press “0” to disable clips or Shift + Tab to switch between Clip and Device views.
- Pro Tools: Use “R” and “T” to zoom in/out, and “B” to cut clips.
- Experiment with Plugins: Both DAWs support VST/AU plugins (Ableton) and AAX plugins (Pro Tools). Try Spitfire Audio for cinematic scoring or Serum for electronic sound design.
Best Practices: Tailoring Your Workflow
- For Beatmakers and Electronic Producers: Ableton Live’s intuitive grid interface and MIDI tools make it unbeatable.
- For Studio Engineers: Pro Tools’ superior audio fidelity and mixing tools are essential for high-end productions.
Ableton Live vs. Pro Tools: Key Differences
1. Workflow and Use Case
- Ableton Live: Excels in electronic music, live performances, and creative sound manipulation with features like Session View and real-time warping.
- Pro Tools: Industry standard for studio recording and mixing, offering precision editing, multitrack capabilities, and a solid mixing environment.
2. Features and Tools
- Ableton Live: Packed with built-in instruments, creative effects (e.g., Beat Repeat), and seamless integration with MIDI and sample libraries.
- Pro Tools: Prioritizes high-fidelity audio, extensive post-production tools, and AI-assisted features for mixing and mastering.
3. Pricing and Collaboration
- Ableton Live: Affordable tiers (Intro to Suite), flexible VST/AU support, and Ableton Link for collaboration.
- Pro Tools: Premium pricing with subscriptions, AVID Cloud Collaboration for remote work, and strong adoption in professional studios.
Pricing
- Ableton Live: Ownership models ranging from $99 (Intro) to $749 (Suite).
- Pro Tools: Subscription-based, starting at $299/year (Standard).
While Ableton’s upfront cost might appeal to budget-conscious beginners, Pro Tools offers more extensive features in its higher-tier subscriptions, catering to looking to get studio-grade production.
Making the Decision
When choosing your first DAW, consider:
- Your Goals: Do you want to experiment or produce polished tracks?
- Learning Curve: Ableton’s simplicity might appeal to beginners, while Pro Tools’ depth requires more commitment.
- Future-Proofing: Both DAWs embrace AI and immersive audio, but Pro Tools leads in advanced capabilities.
Final Words
In the end, it’s about what works for you. Ableton is great for live shows and electronic music. Pro Tools is ideal for studio recording and mixing. Ableton Live is hard to beat. But if studio recording and detailed mixing are more your thing, Pro Tools might be the better fit.
For beginners, Ableton Live is often the better choice due to its intuitive interface, ease of use, and creative flexibility – especially for electronic music. However, you may have a mindset that fits the studio recording and mixing flow – then Pro Tools is worth considering.
The best way to decide? Try them both and see which one feels right for your workflow.


Comments