
Producers of any music genre tend to need tight, punchy drum sounds. From hip-hop to EDM – proper drum bus processing makes a big difference to the overall mix. In this blog, we’ll explore how to use a limiter on your drum bus to improve your tracks. By the end, you’ll understand how to tighten your drum sounds for a professional mix.
You Will Learn
- How to use a limiter on your drum bus to tighten drum sounds.
- Key limiter settings like attack, release, and oversampling for optimal results.
- Techniques to enhance punch and stereo image without over-compression.
- Layering and refining drums with EQ, compression, and effects.
- Best practices for creating genre-specific drum dynamics.
Why Drum Tightness Matters
Drums are the backbone of most tracks. They are the driving the rhythm and energy. Loose or inconsistent dynamics can dilute the impact of your mix. By using a limiter, you can:
- Control dynamics and tame transients.
- Enhance the stereo image of your drum bus.
- Add punch and clarity without over-compression.
Step-by-Step: Tightening Drums with a Limiter
Follow these steps to get the best results:
1. Add a Limiter to Your Drum Bus
- Place the limiter as the final effect in your drum bus processing chain.
- This ensures all drum elements are treated cohesively.
2. Adjust the Attack and Release
- Attack: Set it to the slowest setting. This preserves the transients, allowing the initial impact of each drum hit to shine.
- Release: Set to the fastest setting. This ensures the limiter reacts quickly, maintaining tight control over the tail of each hit.
3. Enable "Punchy" Mode
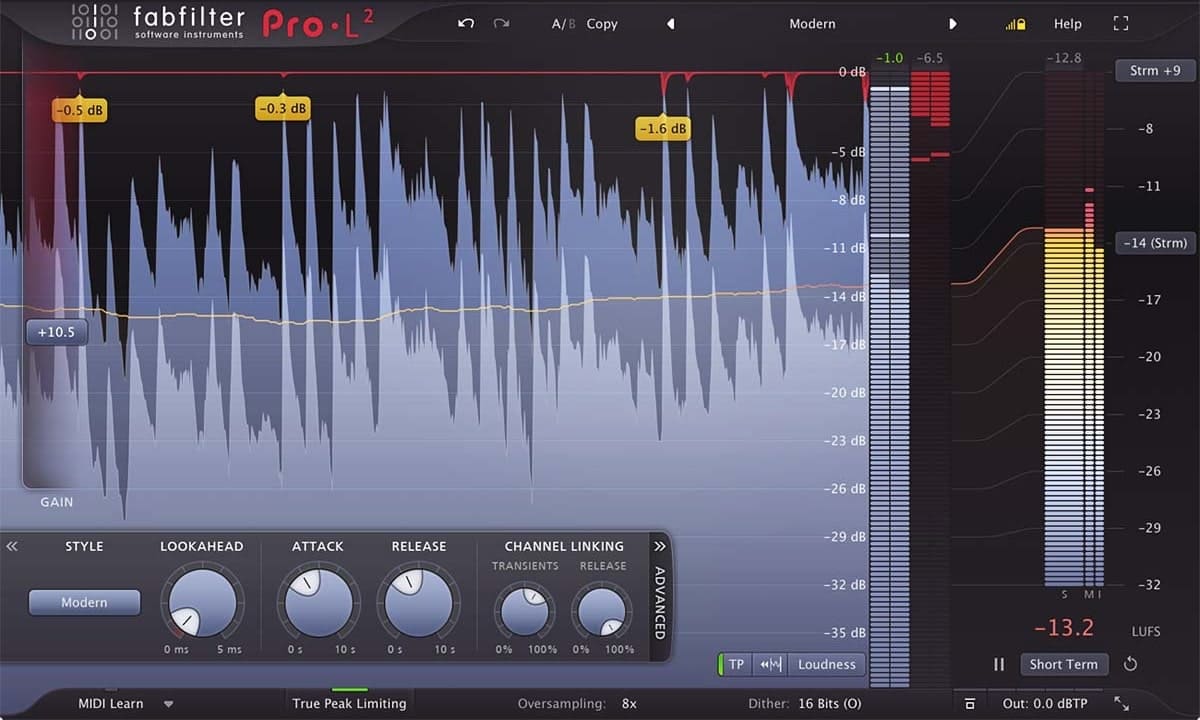
- Many limiters, like the FabFilter Pro-L2, feature modes designed to retain punch while limiting peaks. Use this to enhance the natural dynamics of your drums.
4. Channel Linking
- Reduce channel linking to 0. This allows the limiter to treat the left and right channels independently. It gives it a wide stereo image while keeping your drums tight.
5. Engage Unity Gain
- Use the 1:1 button (if available) to maintain consistent output levels. This avoids drastic volume changes while processing.
6. Activate Oversampling
- Enable 16x oversampling to prevent aliasing and achieve cleaner results, especially in high-energy tracks.
7. Adjust Gain
- Once your limiter settings are dialed in, gently increase the input gain to add subtle punch. Avoid overloading the limiter to keep the sound natural.
Pro Tip: Layer and Refine
- Layer Drum Sounds: Use samples from Sample Focus to reinforce kicks, snares, and hi-hats.
- EQ and Compression: Pair your limiter with EQ to remove unwanted frequencies and compression to smooth the dynamics further.
- Reverb and Delay: Use effects to add depth while maintaining tightness.
Genres That Benefit From Tight Drums
- Hip-Hop: A punchy kick and snare define the groove and energy.
- House and Techno: Consistent dynamics keep the rhythm driving on the dance floor.
- Pop and Rock: Tight drums ensure clarity in dense mixes.
Explore drum samples on Sample Focus to find the perfect sounds for your genre. Whether you need vintage drum machine hits or organic acoustic samples, our library will have the loops to make you sound different.
Recap
- A limiter on the drum bus controls dynamics and enhances clarity.
- Adjust attack, release, and gain for punchy, natural-sounding drums.
- Use channel linking and oversampling for a clean, wide stereo image.
- Layer samples and pair with EQ for refined drum tones.
- Experiment with these techniques to achieve professional mixes across genres.
Final Words
Tightening your drums with a limiter is a straightforward yet useful technique. Control dynamic and maintain punch to make your drums stand out in any mix. Experiment with these settings, combine them with high-quality samples, and watch your track completely change.
Start refining your sound today with drum samples from Sample Focus.


Comments