

An intoxicating blend of retro-nostalgia and a satirical take on the histrionic vibe of 90s culture, vaporwave was born in the early 2010s in the hidden corners of turntable.fm and Tumblr, to become a cultural phenomenon that transcends art forms.
It’s easy to understand how vaporwave has thrived as a genre for almost 15 years. The synthetic sound artifacts and lo-fi approach create a nostalgic vibe that carries a cultural statement: there was a time when the future seemed too good to be true. And it turned out that it was.
Anyway, today we’ll talk all about this fascinating genre, its origins and defining features, and I’ll show you how to make a vaporwave track using exclusively samples from Sample Focus!
What Is Vaporwave Music?
Vaporwave started off as an underground spin-off of chillwave and hypnagogic pop, but unlike these genres that focused on original music, vaporwave was more about sampling old pop songs and commercials from the 80s and 90s.
Artists would slow tracks down, chop them, add reverb and vinyl/tape sound, to create something simultaneously sad and dreamy. A retro style, combined with neon-colored visuals, brought to life a multisensorial experience that focused on memories from the "good old days."
What Defines Vaporwave?
There are no established rules, but here are the most common features you might find in a vaporwave track:
· Sampling 80s and 90s Music: could be corporate background music, R&B, smooth jazz, synth-pop, or anything that to your ears sounds retro.
· Changing Pitch and Speed: songs are usually slowed down by 20–40%, and the pitch is shifted down to create a vintage analog effect.
· "Nostalgic" Sound: heavy reverb, chorus, and tape or vinyl noise to give the sound an old-school effect.
· "Dreamy" Feelings: usually there are no big variations in a vaporwave song. They mainly focus on mood and repetition, hence the hypnotic feel that defines them.
The result should feel like listening to an 80s/90s song through a CRT television or a warped VHS tape.
Make A Vaporwave Track with Samples
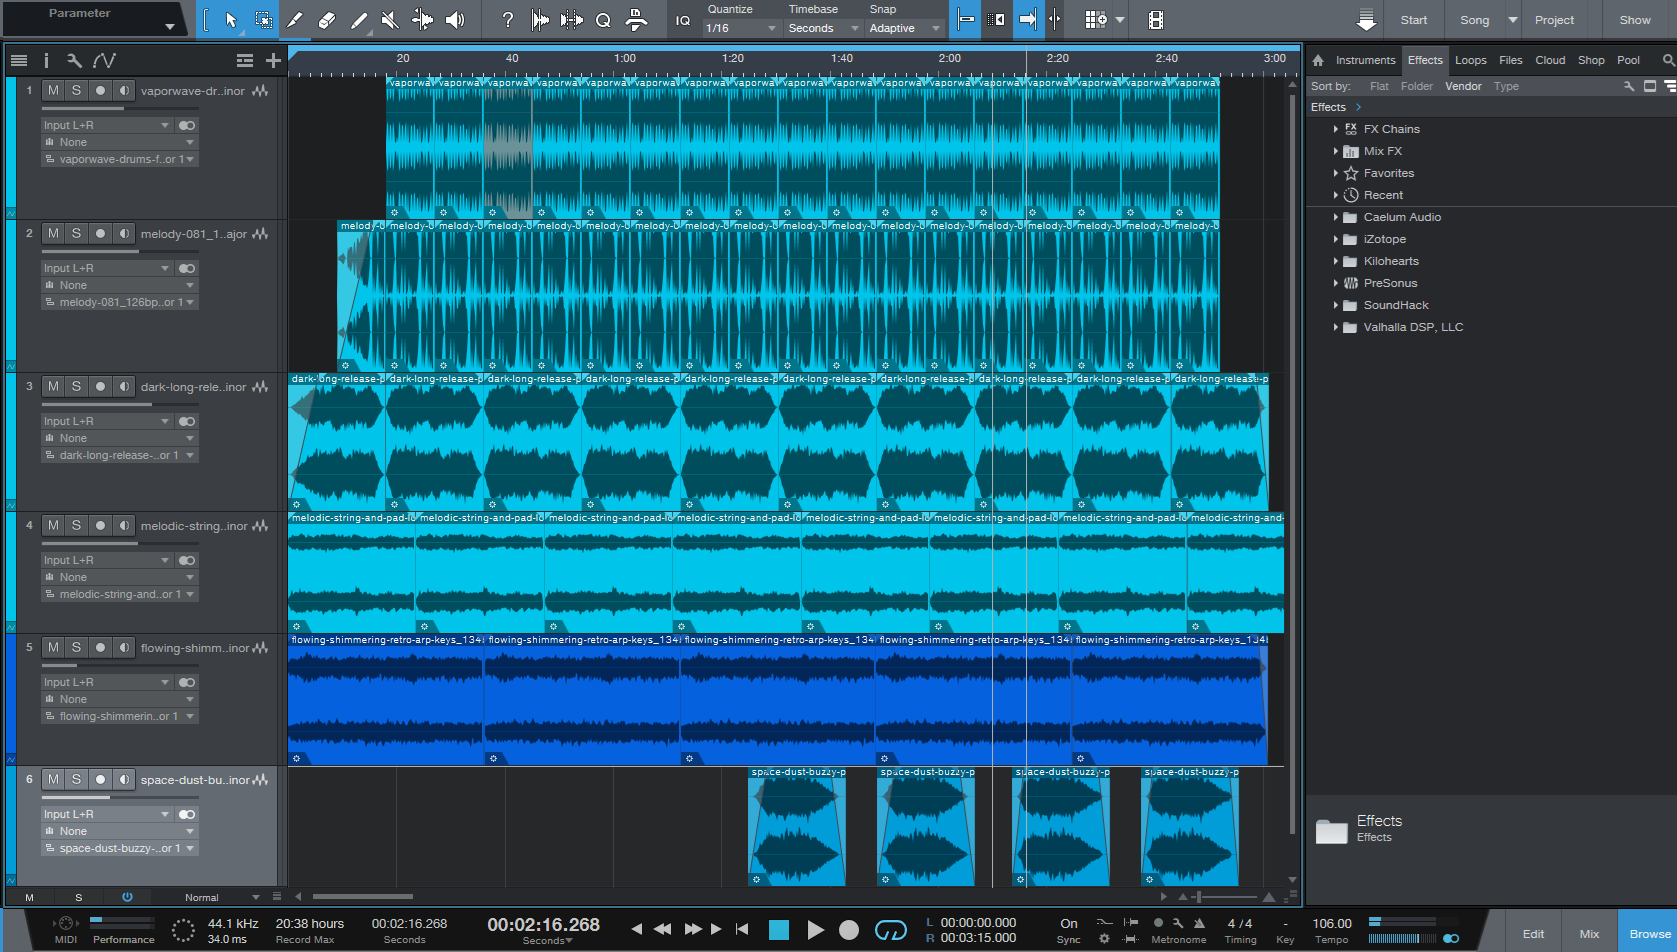
For the purpose of this article, I created a simple vaporwave track using exclusively samples from Sample Focus. In the next section, I’ll guide you through each step I took to make it.
This process is by no means the only way to make a vaporwave piece, and most of your workflow will be affected by the DAW, samples, and effects you decide to use. So keep an open mind!
Best DAWs for Vaporwave
Certain DAWs work better than others when making vaporwave; personally, I’d recommend a non-destructive one that applies pitch-shifting easily, and allows you to hear how your plugins affect sound in real-time.
For this experiment, I used Studio One, which is my go-to DAW these days. However, I’d imagine Reaper, Ableton, or FL Studio would have worked just as well. Maybe I wouldn’t go for Pro Tools (too complex and band-focused) or Audacity (destructive approach to editing), but essentially, you can go for whatever DAW you’re comfortable with.
Find Your Samples
All the samples I used for my track are in this playlist.
Finding your target sample sources is the most important step. You can change their pitch, chop them, slow them down, and render them unrecognizable (that’s crucial, especially if you’re sampling copyrighted material).
I usually start with finding a melody I like, and in my case, it was this sample by Darko:
https://samplefocus.com/samples/flowing-shimmering-retro-arp-keys
When slowed down to 106bpm, it has a retro vibe that works perfectly in vaporwave music.
Once the main melody was set in stone, I focused on the beat. There’s a huge selection of vintage-sounding rhythms on Sample Focus, and I found the perfect one for my needs among robi robi’s catalog:
https://samplefocus.com/samples/vaporwave-drums-full-the-light-soul-c
With the main melody and beat ready, it was all about finding the ideal chords and ambient layers to make the song feel fuller and richer. For the sake of simplicity, I decided to pick samples already in the key of the main melody (G minor), but you can also select samples on different keys and then use a pitch-shifting tool on your DAW to align them with the song’s key. Options are endless.
Manipulate Pitch and Tempo
To create that signature dreamy vibe of vaporwave, try slowing your track down by 20–40%. For instance, the main melody I used for this piece is at 134 bpm, but the final track is at 106bpm.
Also, the sound tends to feel deeper and more groovy when you lower the pitch, so if your track feels too vibrant by vaporwave standards, play with pitch shifting until you hit the sweet spot. This is one of the secret recipes of lo-fi music sampling.
Just be careful with vocals; speeding up voices can make them sound weird.
Best Effects for Vaporwave Music Production
The goal of effects is to create that nostalgic, vintage, and dreamy vibe that defines the vaporwave genre.
While it all comes down to the original samples you picked, here are the unmissable effects you should apply to your track:
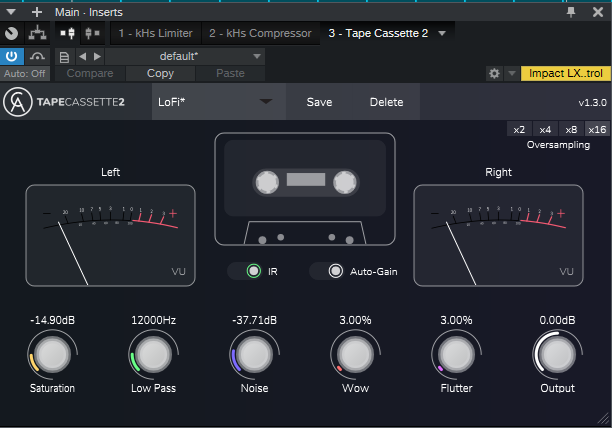
· EQ: Cut off bass below 100 Hz and treble above 8 kHz. This will create the tape effect you aim for, and give the song its old-school vibe.
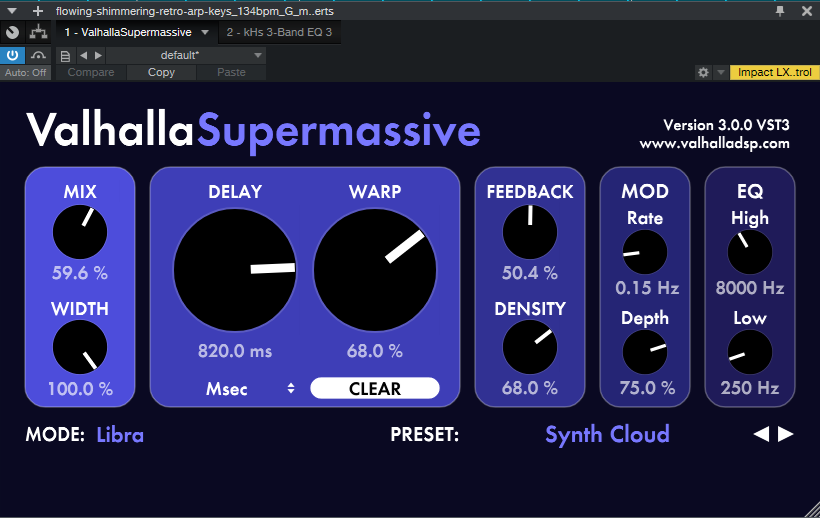
· Reverb: The bigger, the better. Get a cathedral or tunnel reverb to create dreamy soundscapes. For this track, I used Valhalla Supermassive; the name says it all.
· Chorus/Flanger: When used wisely, a chorus can enhance the track’s washed-out effect. Just make sure not to overdo it.
· Distortion/Bitcrush: Again, not too much, but a little bit of distortion can perfectly emulate the VHS grit.
· Delay: Add more space with the delay; subtle echoes (1/8 or 1/16 note) and minimal stereo delay can add depth without compromising the vintage sound atmosphere.
· Compression: A crucial tool to give your song punch and cohesiveness. You can also apply an expander/noise gate to create a VHS-style gain-pump effect. The result should be an old-sounding song with a modern "pumping".
Add Finishing Touches
It’s time to add the final touches to your mix.
Start by adding a vinyl crackle or tape hiss effect to the mix track. In this way, the effect will be applied uniformly to all samples, and enhance the sense of cohesiveness.
Given that vaporwave tracks are more about vibe than progression, you can automate effects, like reverb or delay, to preserve the song’s hypnotic effect while adding some variety to it.
All in all, the song’s evolution should feel fluid and organic, without sudden changes or a standard chorus-verse structure. It should take the listeners on a journey through time, and immerse them in the atmosphere of a bygone era.
Are you ready to give it a go? Start creating your own vaporwave track today, using the vast collection of samples available on Sample Focus!
Comments