
Percussive elements add rhythm and energy to your tracks. You can give your tracks feel even more dynamic by making a few minor tweaks. Here's a quick and easy way to create percussive movement on Ableton Live using one-shot samples – and make you sound different.
But before we walk you through it, check out our video that will show you exactly how to do it. Then, we'll outline the steps you need to follow and also add in some bonus advanced techniques in this blog.
Step 1: Download Percussive One-Shots
First things first, you'll need some percussive one-shot samples. Sample Focus offers a wide range of samples from various genres. Spend some time exploring and download a collection of percussive one-shots that catch your ear.
Step 2: Load Samples into Drum Rack
Once you have your samples, open Ableton Live and load them into the Drum Rack. All your samples need to have similar volumes to keep your track consistent. This will make your mix much easier to manage later on.
Step 3: Create a MIDI Clip
Now, create a new MIDI clip in your project. Drag your percussive one-shot notes into this clip. This setup will allow you to sequence them easily, giving you full control over the rhythm and placement of each sound.
Step 4: Add an Arpeggiator
To add some complexity and movement, apply an arpeggiator (ARP) to your MIDI clip. Play around with the settings to match your style.
Step 5: Apply Audio Effects
Now add audio effects:
- Autopan: create a sense of movement by panning the sound left and right.
- Delay with LFO: a very short delay and map an LFO (Low-Frequency Oscillator) to the dry/wet parameter and the feedback of the delay. Set the LFO to random for some interesting, robotic vibes.
Step 6: Experiment
With your basic setup in place, start experimenting!
Explore Sample Focus
Remember, Sample Focus is a fantastic resource not just for percussive samples, but for a wide variety of sounds across all genres. Spend some time exploring their library to expand your sample collection and find new inspiration.
Example Workflow
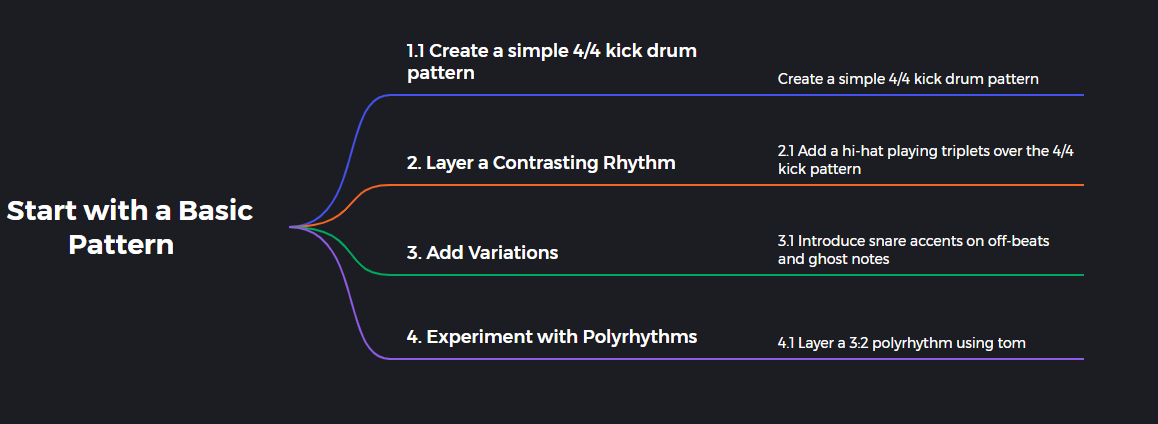
- Start with a Basic Pattern:
- Create a simple 4/4 kick drum pattern.
- Layer a Contrasting Rhythm:
- Add a hi-hat playing triplets over the 4/4 kick pattern.
- Add Variations:
- Introduce snare accents on off-beats and ghost notes.
- Experiment with Polyrhythms:
- Layer a 3:2 polyrhythm using toms or percussion.
- Refine and Adjust:
- Adjust velocities, timing, and effects to blend rhythms.
Percussive Movement

Advanced Techniques for Dynamic & Engaging Percussion
Here are some advanced techniques and best practices to help you achieve dynamic and captivating percussive movements.
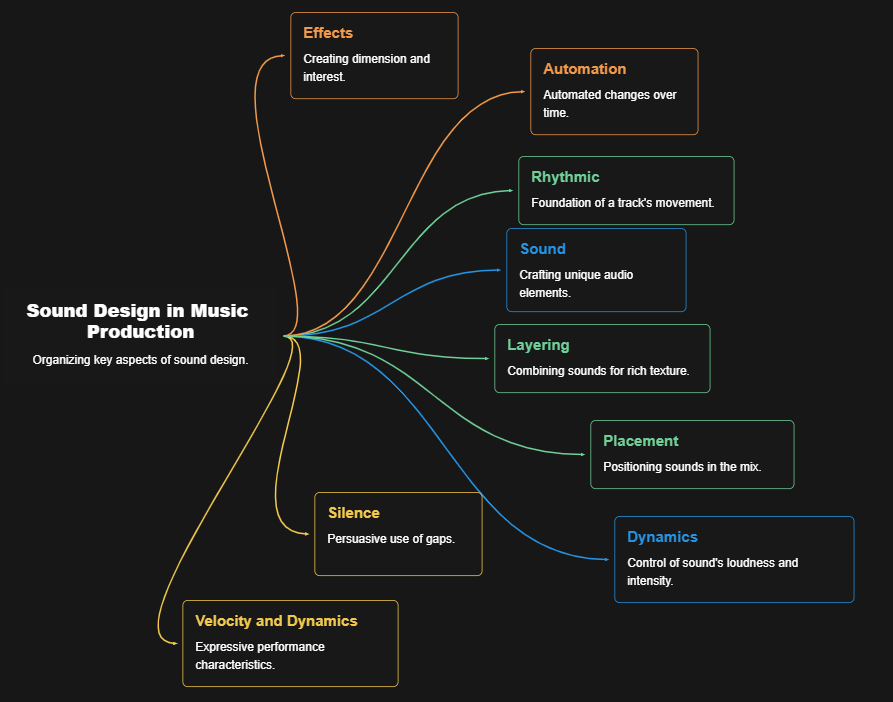
Layering Sounds
- Combine Different Textures: Layer multiple percussive sounds to create richer textures. For instance, combine a snappy snare (high-passed at 200Hz) with a deeper clap (low-passed at 2kHz) for added depth.
- Use Complementary Frequencies: Ensure the layered sounds occupy different frequency ranges. Use a spectrum analyzer to avoid frequency clashes and achieve a balanced mix.
Velocity and Timing
- Humanize Your Beats: Adjust the velocity of individual hits to create a more natural feel. Set velocities between 80-120 on a scale of 127 and use MIDI randomization for subtle variations.
- Swing and Groove: Apply swing settings (e.g., 16th note swing at 55%) to add groove. Use groove templates in your DAW to match the feel of your track.
Dynamics
- Volume Automation:
- Create crescendos and decrescendos to add movement.
- Automate volume from -6dB to 0dB over 8 bars to build intensity.
- Dynamic Effects:
- Use a transient shaper (e.g., Attack at +10%, Sustain at -5%) to enhance the punch of your percussion.
- Apply a compressor with a fast attack (5ms) and medium release (100ms) to control dynamics.
Effects
- Reverb and Delay:
- Add a short reverb (decay time of 0.5s, pre-delay of 20ms) for spatial depth.
- Use delay with a feedback setting of 30% and a sync rate of 1/8 for rhythmic echoes.
- Modulation Effects:
- Apply flanger (rate at 0.25Hz, depth at 50%)
- phaser (4 stages, rate at 0.5Hz) to add movement.
Rhythmic Variation
- Pattern Variation: Change the kick pattern every 4 bars or add ghost notes on the snare for variation.
- Polyrhythms and Syncopation: Experiment with polyrhythms (e.g., 3/4 rhythm over a 4/4 beat) and syncopation to add complexity.
Use of Silence
- Breaks and Pauses: Incorporate breaks (e.g., a 1-bar break every 16 bars) to create tension and release. Use silence strategically to highlight upcoming sections.
Sound Design
- Custom Samples:
- Record and manipulate everyday sounds (e.g., tapping on a desk) to create unique percussive samples.
- Shape these sounds with EQ (high-pass at 100Hz) and compression (2:1 ratio).
- Synthesized Percussion:
- Design percussive sounds using synthesizers.
- Create a kick using a sine wave (pitch envelope from 60Hz to 20Hz)
- snare using white noise (band-pass filter at 1kHz).
Automation and Modulation
- Parameter Automation:
- Automate parameters like filter cutoff (sweep from 200Hz to 2kHz over 4 bars)
- pitch (pitch bend range of ±2 semitones) to add movement.
- LFOs and Envelopes:
- Use LFOs to modulate filter cutoff (rate at 0.5Hz)
- panning (depth at 50%).
- Apply envelopes to control parameters dynamically.
Contextual Placement
- Mixing and Panning:
- Use panning to place percussive elements in the stereo field (e.g., hi-hats panned 30% left, shakers 30% right).
- Apply EQ to carve out space (e.g., cut at 300Hz for kick, boost at 5kHz for snare).
- EQ and Frequency Management:
- Use a multi-band EQ to manage frequencies.
- Cut low frequencies (below 200Hz) from non-bass percussion to avoid muddiness.
Analyze and Learn
Listen to tracks from your favorite producers and analyze their percussive elements. Use reference tracks to match the tonal balance and dynamic range of your mix.
Sound Design & Music Production
Final Words
Creating dynamic and interesting percussive movements in Ableton Live involves a combination of sound design, rhythmic variation, and creative use of effects. By following these steps and techniques, you can add depth and complexity to your music, making it more engaging and professional.
Comments